Monday, July 11, 2011
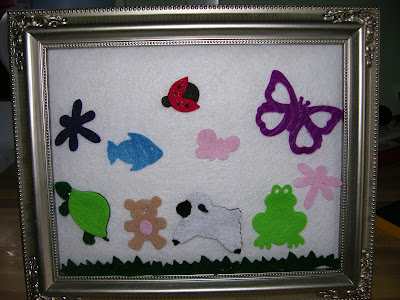
Make it Monday - Travel Felt Board
We're headed to the beach soon, and I've been trying to think of things to occupy the kids on the journey. Coco has his Leapster, and we do have a portable DVD player we're taking, but I am not delusional that these things will keep the kids busy for a four hour drive.
Felt boards are always fun and can even be educational. I guess the pros would call it "open ended play" or something like that - you know, where the play can just go on and on and on as long as their imaginations will take them. Sounds good to me!
This little travel felt board was super easy to make - it only took about 10 minutes to assemble - and I can make little felt pieces to go with it to my heart's content. Best part is that felt sticks to felt naturally, so there (hopefully) won't be any frustration if Coco or Mable drops it in the floor.
You'll need:
* A photo frame (I used an old one we don't display anymore) - Take out the glass, but leave everything else
* An artist canvas to fit inside the frame
* Quilt batting the same size as the canvas
* Felt (either black or white is best) that is 1 inch longer on all sides than the canvas
* Hot glue gun
* Scissors
I'm assuming you'll use common sense when working with the scissors and glue gun, right?
To get started, lay the felt on a flat surface, then center the quilt batting in the middle of the felt. Lay the artist canvas on top of the quilt batting in the center of the felt. If you want to glue the batting on the canvas before you put it on the felt, that's fine too.
Run a small strip of glue up the side of the canvas, working at about three inch intervals, and pull the felt up and glue it to the canvas. Continue on one side, then the other (we'll do the top and bottom next).
Snip the corners of the glued felt so they'll fold in and glue flat. Once you've done that, glue the top and bottom felt to the back of the canvas, using the same technique you used above. This will finish the board.
The last step (before you make all the cute shapes and such) is just laying the board into the frame (without the glass) and secure the back onto the frame.
I used my old Sizzix to cut cute animal shapes (and grass!), but you can really just use scissors and creativity. Cut whatever shapes you want out of felt and have fun! If you try to cut felt with the Sizzlits dies (those small thin ones), you're really just going to emboss an outline on the felt, then you'll have to go back and cut the felt with scissors. The original Sizzix are the BEST for cutting felt.
Labels:
animals,
board,
diy,
easy projects,
felt,
felt board,
make it monday,
shapes,
travel
Subscribe to:
Post Comments (Atom)


No comments:
Post a Comment
Comments are moderated before they are published. Please be respectful of one another, or I just won't publish it. ;)